08 - Super resolution
Advanced Image Processing
Poznan University of Technology, Institute of Robotics and Machine Intelligence
![]()
Laboratory 8: Super Resolution
Introduction
Super resolution is a computer vision task that aims to reconstruct a high-resolution (HR) image from a low-resolution (LR) input. This laboratory will guide you through both classical and deep learning approaches to super resolution, helping you understand the fundamental differences and advantages of modern neural network-based methods.
Goals
The objectives of this laboratory are to:
- Understand the mathematical foundations and challenges of super resolution
- Implement traditional interpolation-based upscaling methods (bicubic, bilinear)
- Load and use pre-trained deep learning models for super resolution (CARN, RCAN, NinaSR)
- Evaluate results using perceptual quality metrics (PSNR, SSIM)
- Compare classical vs. deep learning approaches quantitatively and qualitatively
Resources
- Deep Learning for Image Super-resolution: A Survey
- torchSR - PyTorch Super Resolution package with pre-trained models
- Image Super-Resolution Using Very Deep Residual Channel Attention Networks
- Fast, Accurate, and Lightweight Super-Resolution with Cascading Residual Network

Image source:
Image
Super-Resolution: An Overview of the Current State of
Research
Prerequisites
Install dependencies
First, let’s set up our Python environment with all necessary dependencies.
PyTorch
pip install torch torchvision --index-url https://download.pytorch.org/whl/cu126Computer Vision libraries
pip install opencv-python pillowMetrics and visualization
pip install matplotlib scikit-imageSuper-Resolution - torchSR
pip install torchsrImage resize
This section provides a link to download the imresize.py
script, which is a Python implementation of MATLAB’s
imresize function.
The deep learning models used in this laboratory were trained on
images that were downscaled using this specific MATLAB resize
implementation. This function produces slightly different results
compared to standard OpenCV (cv2.resize) or Pillow
(PIL.Image.resize) methods due to differences in
interpolation kernels and boundary handling. Therefore, in this
laboratory we will use a Python implementation of MATLAB’s
imresize function, which is available in imresize.py
script.
💥 Task 1 💥
Download imresize.py script and place it in the working directory of this lab.
Using imresize
To downscale an image, call imresize.imresize() with the
image array, scale factor, and interpolation method. The scale factor
can be a float (e.g., 0.25 for 4x downscaling) or a tuple specifying
output dimensions. Common interpolation methods include
"nearest", "bilinear", and
"bicubic". In the following tasks we will use
scalar_scale=0.25 and method="bicubic", as in
the example below.
import imresize

# Downscale image to 25% of original size using bicubic interpolation
img_lr = imresize.imresize(img_original, scalar_scale=0.25, method="bicubic")
Import libraries
import cv2
import matplotlib.pyplot as plt
import numpy as np
import requests
import torch
from PIL import Image
from skimage.metrics import peak_signal_noise_ratio as psnr
from skimage.metrics import structural_similarity as ssim
from torchsr.models import carn, rcan
from torchsr.models.ninasr import ninasr_b2

import imresize
Load image
img_url = "https://raw.githubusercontent.com/Coloquinte/torchSR/v1.0.2/doc/example_hr.png"
response = requests.get(img_url, stream=True)
img_original = np.asarray(Image.open(response.raw).convert("RGB"))

print(f"Original image shape: {img_original.shape}")
print(f"Original image size: {img_original.shape[0] * img_original.shape[1]} pixels")

# Create low-resolution version using bicubic downsampling from imresize module
img_lr = imresize.imresize(img_original, 0.25, method="bicubic")

print(f"LR image shape: {img_lr.shape}")
print(f"LR image size: {img_lr.shape[0] * img_lr.shape[1]} pixels")
print(f"Information loss: {100 * (1 - img_lr.size / img_original.size):.2f}%")
Super-Resolution
Mathematical background
The super resolution problem can be formulated as:
\[ I_{LR} = (I_{HR} \otimes k) \downarrow_s + n \]
Where:
- \(I_{HR}\) is the high-resolution image
- \(I_{LR}\) is the low-resolution image
- \(\otimes\) denotes convolution with a blur kernel \(k\)
- \(\downarrow_s\) represents downsampling by factor \(s\)
- \(n\) is additive noise
Our goal is to learn a function \(f\) such that: \[ \hat{I}_{HR} = f(I_{LR}) \approx I_{HR} \]
Metrics
Peak Signal-to-Noise Ratio (PSNR)
PSNR is a metric used to measure the quality of a reconstructed or compressed image by comparing it to an original, high-quality image. It’s based on the Mean Squared Error (MSE) between the two images and it measures the ratio between the maximum possible pixel value (\(MAX_I\)) and the “noise” (the errors introduced by compression or processing).
\[ PSNR = 10 \cdot \log_{10} \left( \frac{MAX_I^2}{MSE} \right) \]
This metric is expressed in decibels (dB) and a higher value means better quality. Nevertheless, PSNR does not always correlate well with human visual perception. An image with a higher PSNR might not necessarily look better to a person than an image with a slightly lower PSNR.
PSNR implementation is available in scikit-image package and example usage is below:
from skimage.metrics import peak_signal_noise_ratio as psnr


psnr_val = psnr(img_original, img_upscaled, data_range=255)  # Image format HWC and data format uint8
Structural Similarity Index (SSIM)
SSIM is a more modern metric designed to measure image quality in a way that aligns better with human perception. It assumes that the human visual system is highly adapted for extracting structural information from a scene. Therefore, it measures the similarity between two images using three components:
- luminance (brightness)
- contrast
- structure (e.g., edges, textures)
SSIM metric is expressed as a decimal value between -1 and 1 (or 0 and 1 for most common use cases). A value of 1 indicates perfect similarity (identical images). A value closer to 1 means the images are more structurally similar and perceived as higher quality.
Overall, SSIM is generally considered a better metric for perceptual quality than PSNR because it accounts for how humans see, not just pixel-by-pixel error.
SSIM implementation is available in scikit-image package and example usage is below:
from skimage.metrics import structural_similarity as ssim


ssim_val = ssim(img_original, img_upscaled, channel_axis=2, data_range=255)  # Image format HWC and data format uint8
Classical approaches to Super-Resolution
Traditional methods use mathematical interpolation to fill in missing pixels. These approaches rely on weighted combinations of neighboring pixel values to estimate the intensity of new pixels at intermediate positions.
- Nearest neighbor interpolation - the simplest method - just copy the nearest pixel value.
- Bilinear interpolation - considers the 4 nearest pixels and performs linear interpolation.
- Bicubic interpolation - considers 16 nearest pixels and uses cubic polynomials.
The quality of results depends primarily on the interpolation kernel used. More sophisticated kernels (such as bicubic) consider more neighboring pixels and employ higher-order polynomials, producing smoother gradients compared to simpler methods (such as nearest neighbor or bilinear).
💥 Task 2 💥
Implement classical approaches to super-resolution using OpenCV
package and cv2.resize method with the following
interpolations:
- nearest neighbor,
- bilinear,
- bicubic.
Compare all three interpolation methods visually (plotting results on the common graph, including original image) and quantitatively (using SSIM and PSNR metrics). Then, answer the following questions:
- Which interpolation method produces the best PSNR/SSIM scores?
- Do the metrics align with your visual perception?
- What are the common artifacts you notice (e.g., blurriness, jagged edges)?
- In your opinion, is the degradation process reversible with simple methods? Why or why not?
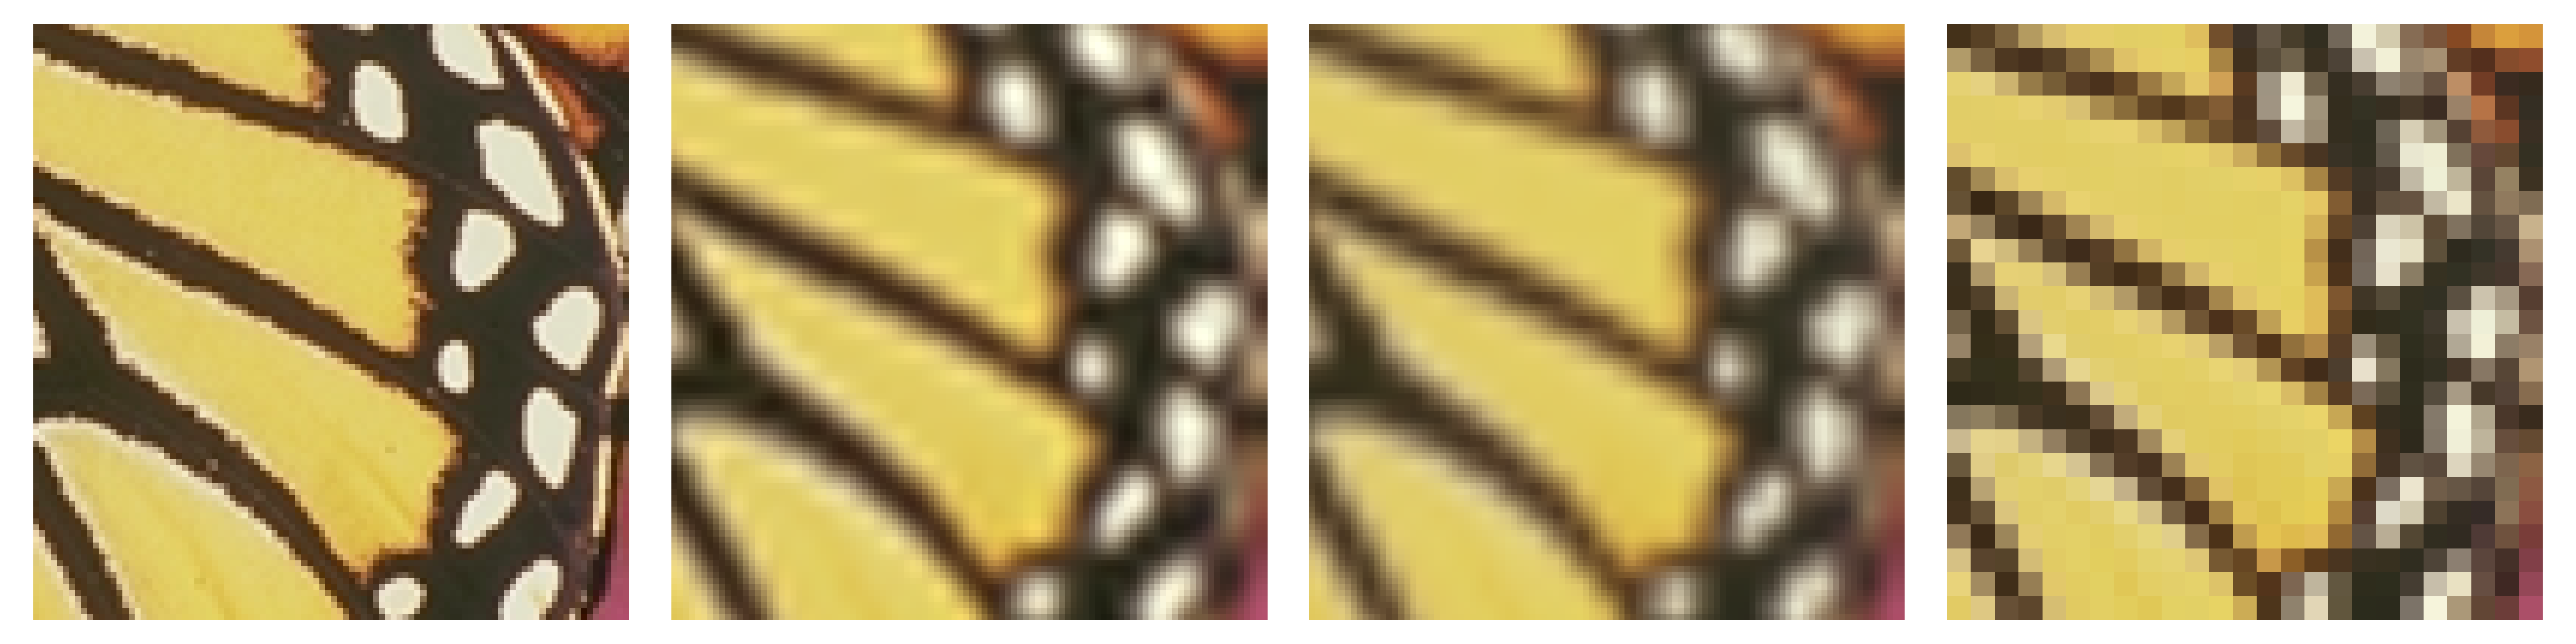
💥 Task 3 💥
Some visual artifacts and quality differences may not be obvious when
viewing the entire image. Therefore, analyze a region of interest (ROI)
using the code snippet below. Select a region of interest from the image
by adjusting the coordinates (y1, y2,
x1, and x2), then zoom in to see the
differences between the interpolation methods more clearly.
ROI analysis
############# TODO: Student code #####################
methods = ["High Resolution", "Nearest Neighbor Interpolation", ...]
images = [img_original, img_nearest_neighbor, ...]

# Define ROI (adjust coordinates based on your image)
y1, y2 = 100, 200
x1, x2 = 200, 300
######################################################

fig, axes = plt.subplots(1, 4, figsize=(16, 4))

axes[0].imshow(img_original[y1:y2, x1:x2])
axes[0].set_title('Original (HR)')
axes[0].axis('off')

for ax, method, img in zip(axes[1:], methods, images):
    ax.imshow(img[y1:y2, x1:x2])
    ax.set_title(f'{method}')
    ax.axis('off')

plt.suptitle('Region of Interest comparison', fontsize=14)
plt.tight_layout()
plt.show()
Deep Learning approach to Super-Resolution
Classical approaches to Super-Resolution, while computationally efficient and mathematically well-defined, are fundamentally limited by their local nature. Interpolation methods cannot recover information that was lost during downsampling; they can only produce smooth approximations based on existing data.
In turn, deep learning approaches overcome these limitations by learning complex, non-linear mappings from extensive training datasets containing pairs of low-resolution and high-resolution images. Neural networks can recognize patterns, textures, and structures that were present in the training data, enabling them to hallucinate plausible high-frequency details rather than simply smoothing between existing pixels. This data-driven approach allows deep learning models to achieve significantly better reconstruction quality, particularly for challenging scenarios involving fine details, textures, and semantic content.
💥 Task 4 💥
Neural networks for image upscaling learn complex mappings from low-resolution to high-resolution images; however, to perform well on new images they require specific input formats and value ranges. Write the preprocessing/postprocessing pipelines by implementing the steps described in the following code snippets.
preprocess
def preprocess_image(img: np.ndarray, device: torch.device) -> torch.Tensor:
    """
    Convert NumPy image to PyTorch tensor format for model input.

    Parameters
    ----------
    img : np.ndarray
        Input image (H, W, C) in range [0, 255]
    device : torch.device
        Target device (CPU or CUDA)

    Returns
    -------
    torch.Tensor
        Preprocessed tensor (1, C, H, W) in range [0, 1]
    """
    # 1. Normalize to [0, 1]
    # 2. Convert HWC to CHW (PyTorch format)
    # 3. Add batch dimension: (C, H, W) -> (1, C, H, W)
    # 4. Convert to PyTorch tensor and move to device

    img_tensor = None

    return img_tensor
postprocess
def postprocess_image(output: torch.Tensor) -> np.ndarray:
    """
    Convert model output tensor back to NumPy image format.

    Parameters
    ----------
    output : torch.Tensor
        Model output tensor (1, C, H, W) in range [0, 1]

    Returns
    -------
    np.ndarray
        Image array (H, W, C) in range [0, 255]
    """
    # 1. Move to CPU, remove batch dimension, clamp values
    # 2. Clamp values to [0, 1] range
    # 3. Convert to NumPy
    # 4. Convert CHW to HWC
    # 5. Denormalize to [0, 255]

    output_np = None

    return output_np
torchSR
torchSR is a comprehensive PyTorch library for super-resolution that provides easy access to multiple state-of-the-art pre-trained models including NinaSR, CARN, RCAN, and others. The library offers models trained on various benchmark datasets (DIV2K, RealSR, Set5, Urban100) with different upscaling factors (x2, x3, x4). It also includes convenient dataset handlers for loading and preprocessing standard super-resolution benchmark datasets, making it straightforward to evaluate and compare different models.
To install torchSR Python package simply call:
pip install torchsrTo use TorchSR:
- Load a pre-trained model with the desired upscaling factor
- Preprocess your low-resolution image to a tensor format
- Run inference on the model
- Postprocess the output tensor back to an image
The above steps are presented by the following code snippet:
import torch
from torchsr.models import carn


device = torch.device("cuda" if torch.cuda.is_available() else "cpu")


def load_CARN_x4():
    model = carn(scale=4, pretrained=True)
    model.eval()
    return model.to(device)


# Load model
model = load_CARN_x4()

# Preprocess
img_tensor = preprocess_image(img_lr, device)

# Run inference
with torch.no_grad():
    output_tensor = model(img_tensor)

# Postprocess
output_img = postprocess_image(output_tensor)
Note: The variable img_lr
(low-resolution image) must be defined before running this code.
💥 Task 5 💥
Run super-resolution model on low-resolution image and verify the results.
Repeat this task for RCAN and NinaSR models available in torchSR package.
💥 Tip:
for NinaSR use version B2, which can be imported from torchSR with the
following statement:
from torchsr.models.ninasr import ninasr_b2
Compare all three interpolation methods visually (plotting results on the common graph, including original image) and quantitatively (using SSIM and PSNR metrics). Then, answer the following questions:
- Which model achieves the highest SSIM? Does it look the best visually?
- How do the metrics correlate with visual quality?

Advanced analysis - perceptual quality analysis
Sharp, well-defined edges are essential for visual clarity and significantly impact perceived image quality. When edges become blurred or distorted by artifacts such as ringing or aliasing, the image appears less natural, even if the overall pixel-level metrics remain acceptable. Hence, edge density can serve as an indicator of detail preservation - higher values typically indicate better preservation of fine details and structural information.
Sharp, well-defined edges are essential for visual clarity and significantly impact perceived image quality. When edges become blurred or distorted by artifacts such as ringing or aliasing, the image appears less natural, even if the overall pixel-level metrics remain acceptable. Hence, edge density can serve as an indicator of detail preservation - a higher values typically indicates better preservation of fine details and structural information.
def analyze_edges(img: np.ndarray) -> float:
    """Analyze edge sharpness using Canny edge detection."""
    # Convert to grayscale
    gray = cv2.cvtColor(img, cv2.COLOR_RGB2GRAY)
    # Apply Canny edge detection
    edges = cv2.Canny(gray, 50, 150)
    # Count edge pixels
    edge_density = np.sum(edges > 0) / edges.size
    return edge_density
💥 Task 6 💥
Apply the analyze_edges function to evaluate edge
preservation across all super-resolution methods implemented in previous
tasks. Calculate edge density for:
- original high-resolution image
- classical interpolation methods (nearest neighbor, bilinear, bicubic)
- deep learning models (CARN, RCAN, NinaSR)
Compare the edge density values and answer the following questions:
- Which method best preserves edge information compared to the original image?
- How do classical methods compare to deep learning approaches in terms of edge density?
- Does higher edge density correlate with better visual quality in your perception?
- Are there any methods that produce artificially high edge density (potential over-sharpening)?
💥 Task 7 💥
Apply super resolution to your own images. Verify, in terms of metrics and visual evaluation, whether pre-trained deep learning models perform better than classical upscaling methods.
Then, consider the following aspects:
- What are the limitations of current approaches?
- In your opinion, how well would these models work with domain-specific images, such as satellite imagery or microscopy? Would they be effective without adaptation to the domain?
- Is “hallucination” a problem in super-resolution tasks?